Puppy Amigurumi – Tammy

I “Ruff” U, Puppy Amigurumi: Tammy
Contributed by: Lee Mei Li of
AmiguruMEISkill level: Intermediate
Duration: About 4 hours
Finished size: about 3″ tall
Abbreviations
• Ch: chain
• Sc: single crochet
• Dc: double crochet
• Inv dec: invisible decrease
Materials
• 2.3mm hook
• Yarn in white, cyan and fuchsia
• Crochet thread in black
• 2 x 4mm black brads
• White felt
• Pink blush
• Darning needle
• Polyester fiberfill
Head
Start with cyan yarn.
Round 1: Sc 6 in magic ring {6}.
Round 2: [Inc] around {12}.
Round 3: [Inc, sc 1] around {18}.
Round 4: [Inc, sc 2] around {24}.
Round 5: [Inc, sc 3] around {30}.
Round 6: [Inc, sc 4] around {36}.
Round 7-8: Sc around {36}.
Round 9: Sc in the next 12 sts, change to white yarn and sc in the next 5 sts, change back to cyan and sc in the next 2sts, change to white and sc in the next 5 sts then change to cyan and sc in the next 12 sts {36}.
Round 10-11: Sc in the next 12 sts (cyan), sc in the next 12 sts (white), sc in the next 12 sts (cyan) {36}.
Round 12: Change to white yarn. Sc around {36}.
Round 13: [Inv dec, sc 4] around {30}.
Round 14: [Inv dec, sc 3] around {24}.
Round 15: [Inv dec, sc 2] around {18}.
Stuff.
Round 16: [Inv dec, sc 1] around {12}.
Round 17: [Inv dec] around {6}.
Fasten off and weave in ends. Leave a long end.
To make eye indentations: Using the remaining end of the yarn, thread it through a stitch at the left side of the head below Round 11. Make a horizontal backstitch. Repeat on the other side. Bring yarn to the bottom of the head and trim excess.
Body
Start with white yarn.
Round 1: Sc 6 in magic ring {6}.
Round 2: [Inc] around {12}.
Round 3: [Inc, sc 1] around {18}.
Round 4: [Inc, sc 2] around {24}.
Round 5: Sc in the next 20 sts, change to cyan yarn and sc in the next 4 sts {24}.
Round 6-9: Sc in the next 4 sts (cyan), sc in the next 16 sts (white), sc in the next 4 sts (cyan) {24}.
Round 10: In the first 4 sts, inv dec, sc 2 (cyan). In the next 16 sts, inv dec, sc 2 (white). In the last 4 sts, inv dec, sc 2 (cyan) {18}.
Fasten off and leave a long end for sewing.
Ears
Make 2 with cyan yarn.
Round 1: Sc 6 in magic ring {6}.
Round 2: [Inc] around {12}.
Round 3-10: Sc around {12}.
Fasten off and leave a long tail for sewing.
Muzzle
Use white yarn.
Round 1: Sc 5 in magic ring {5}.
Round 2: Sc around {10}.
Fasten off and leave a long tail for sewing.
Arms
Make 2 with white yarn.
Round 1: Sc 6 in magic ring {6}.
Round 2-5: Sc around {6}.
Fasten off and leave a long tail for sewing.
Feet
Make 2 with white yarn.
Round 1: Sc 6 in magic ring {6}.
Round 2: [Inc] around {12}.
Round 3: Sc around {12}.
Round 4: [Inv dec] around {6}.
Fasten off and weave in ends but leave a long tail for sewing.
Flatten.
Tail
Use white yarn.
Round 1: Sc 3 in magic ring {3}.
Round 2: [Inc] around {6}.
Round 3: [Inc, sc 1] around {9}.
Round 4: Sc around {9}.
Round 5: [Inv dec, sc 1] around {6}.
Round 6: Sc around {6}.
Fasten off and leave a long tail for sewing.
Heart
Use fuchsia yarn. This pattern is made by joining two pieces together.
To make the first piece:
Round 1: Sc 8 in magic ring {8}.
Round 2-3: Sc around {8}.
Fasten off and leave a long end for sewing.
To make the second piece:
Round 1: Sc 8 in magic ring {8}.
Round 2-3: Sc around {8}.
Round 4: This will be where the two pieces join. Sc in the next 6 sts, then continue on to sc in the sts of the first heart piece. When you reach back to the second heart piece, sc in the remaining sts {16}. (you may use excess yarn from the first piece to tighten any gaps between the two pieces)
Round 5: [Inv dec, sc 2] around {12}.
Round 6: [Inv dec, sc 1] around {8}.
Round 7: [Inv dec] around {4}.
Fasten off and weave in ends. Leave a long end for sewing.
Assembly
1. Sew muzzle onto head.
2. Using black crochet thread, sew on the nose using a series of horizontal backstitches. We made a total of 11 backstitches for tiny Tammy.
3. With the remaining black crochet thread, sew a W shape for the lips. Make tiny backstitch loops near the curves to turn it into a smile. Try using your darning needle to push the curves into place.
4. Cut white felt into two small crescent shapes, matching the size of the black brads. Pair them up with the black brads and glue them onto where the eye indentations are.
5. Sew on the body, arms, feet, ears and tail.
6. Sew heart onto the front of the body.
7. Add a pop of blush onto Tammy’s cheeks.

Make eye indentations by sewing a horizontal backstitch at a spot on the right and left side of the head below Round 11.

Sew muzzle onto head.

Glue on black brads as eyes.

Sew on the nose using a series of horizontal backstitches.

Sew on the lips.

Make tiny backstitch loops near the curves to turn it into a smile.

Try using your darning needle to push the curves into place.

Pins parts to the body and sew them on.

Sew heart onto the front of the body.


 Make eye indentations by sewing a horizontal backstitch at a spot on the right and left side of the head below Round 11.
 Sew muzzle onto head.
 Glue on black brads as eyes.
 Sew on the nose using a series of horizontal backstitches.
 Sew on the lips.
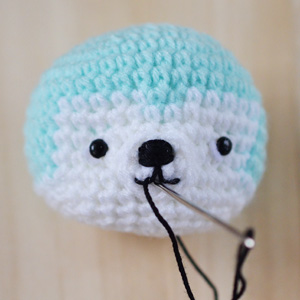 Make tiny backstitch loops near the curves to turn it into a smile.
 Try using your darning needle to push the curves into place.
 Pins parts to the body and sew them on.
 Sew heart onto the front of the body.


